


Ready to order
Elkhart RV Parts - Universal Holding Tank Fittings Kit - Black & Grey Water - 4 Sensors - 3" & 1.5" Couplers - Complete DIY Installation Kit
Uses the existing quantity, variant, and delivery estimate
---
Complete Universal Holding Tank Fittings Kit - Everything You Need for Professional Black & Grey Water Tank Installation
Installing or customizing your RV holding tank has never been easier. This comprehensive universal fittings kit includes everything you need to outfit your black water or grey water tank with professional-grade fittings and accurate level sensors. Whether you're replacing a damaged tank, upgrading to a larger capacity, or building a custom RV system, this complete kit delivers OEM-quality components with detailed installation instructions that make the job straightforward for DIYers and professionals alike.
Features & Specifications
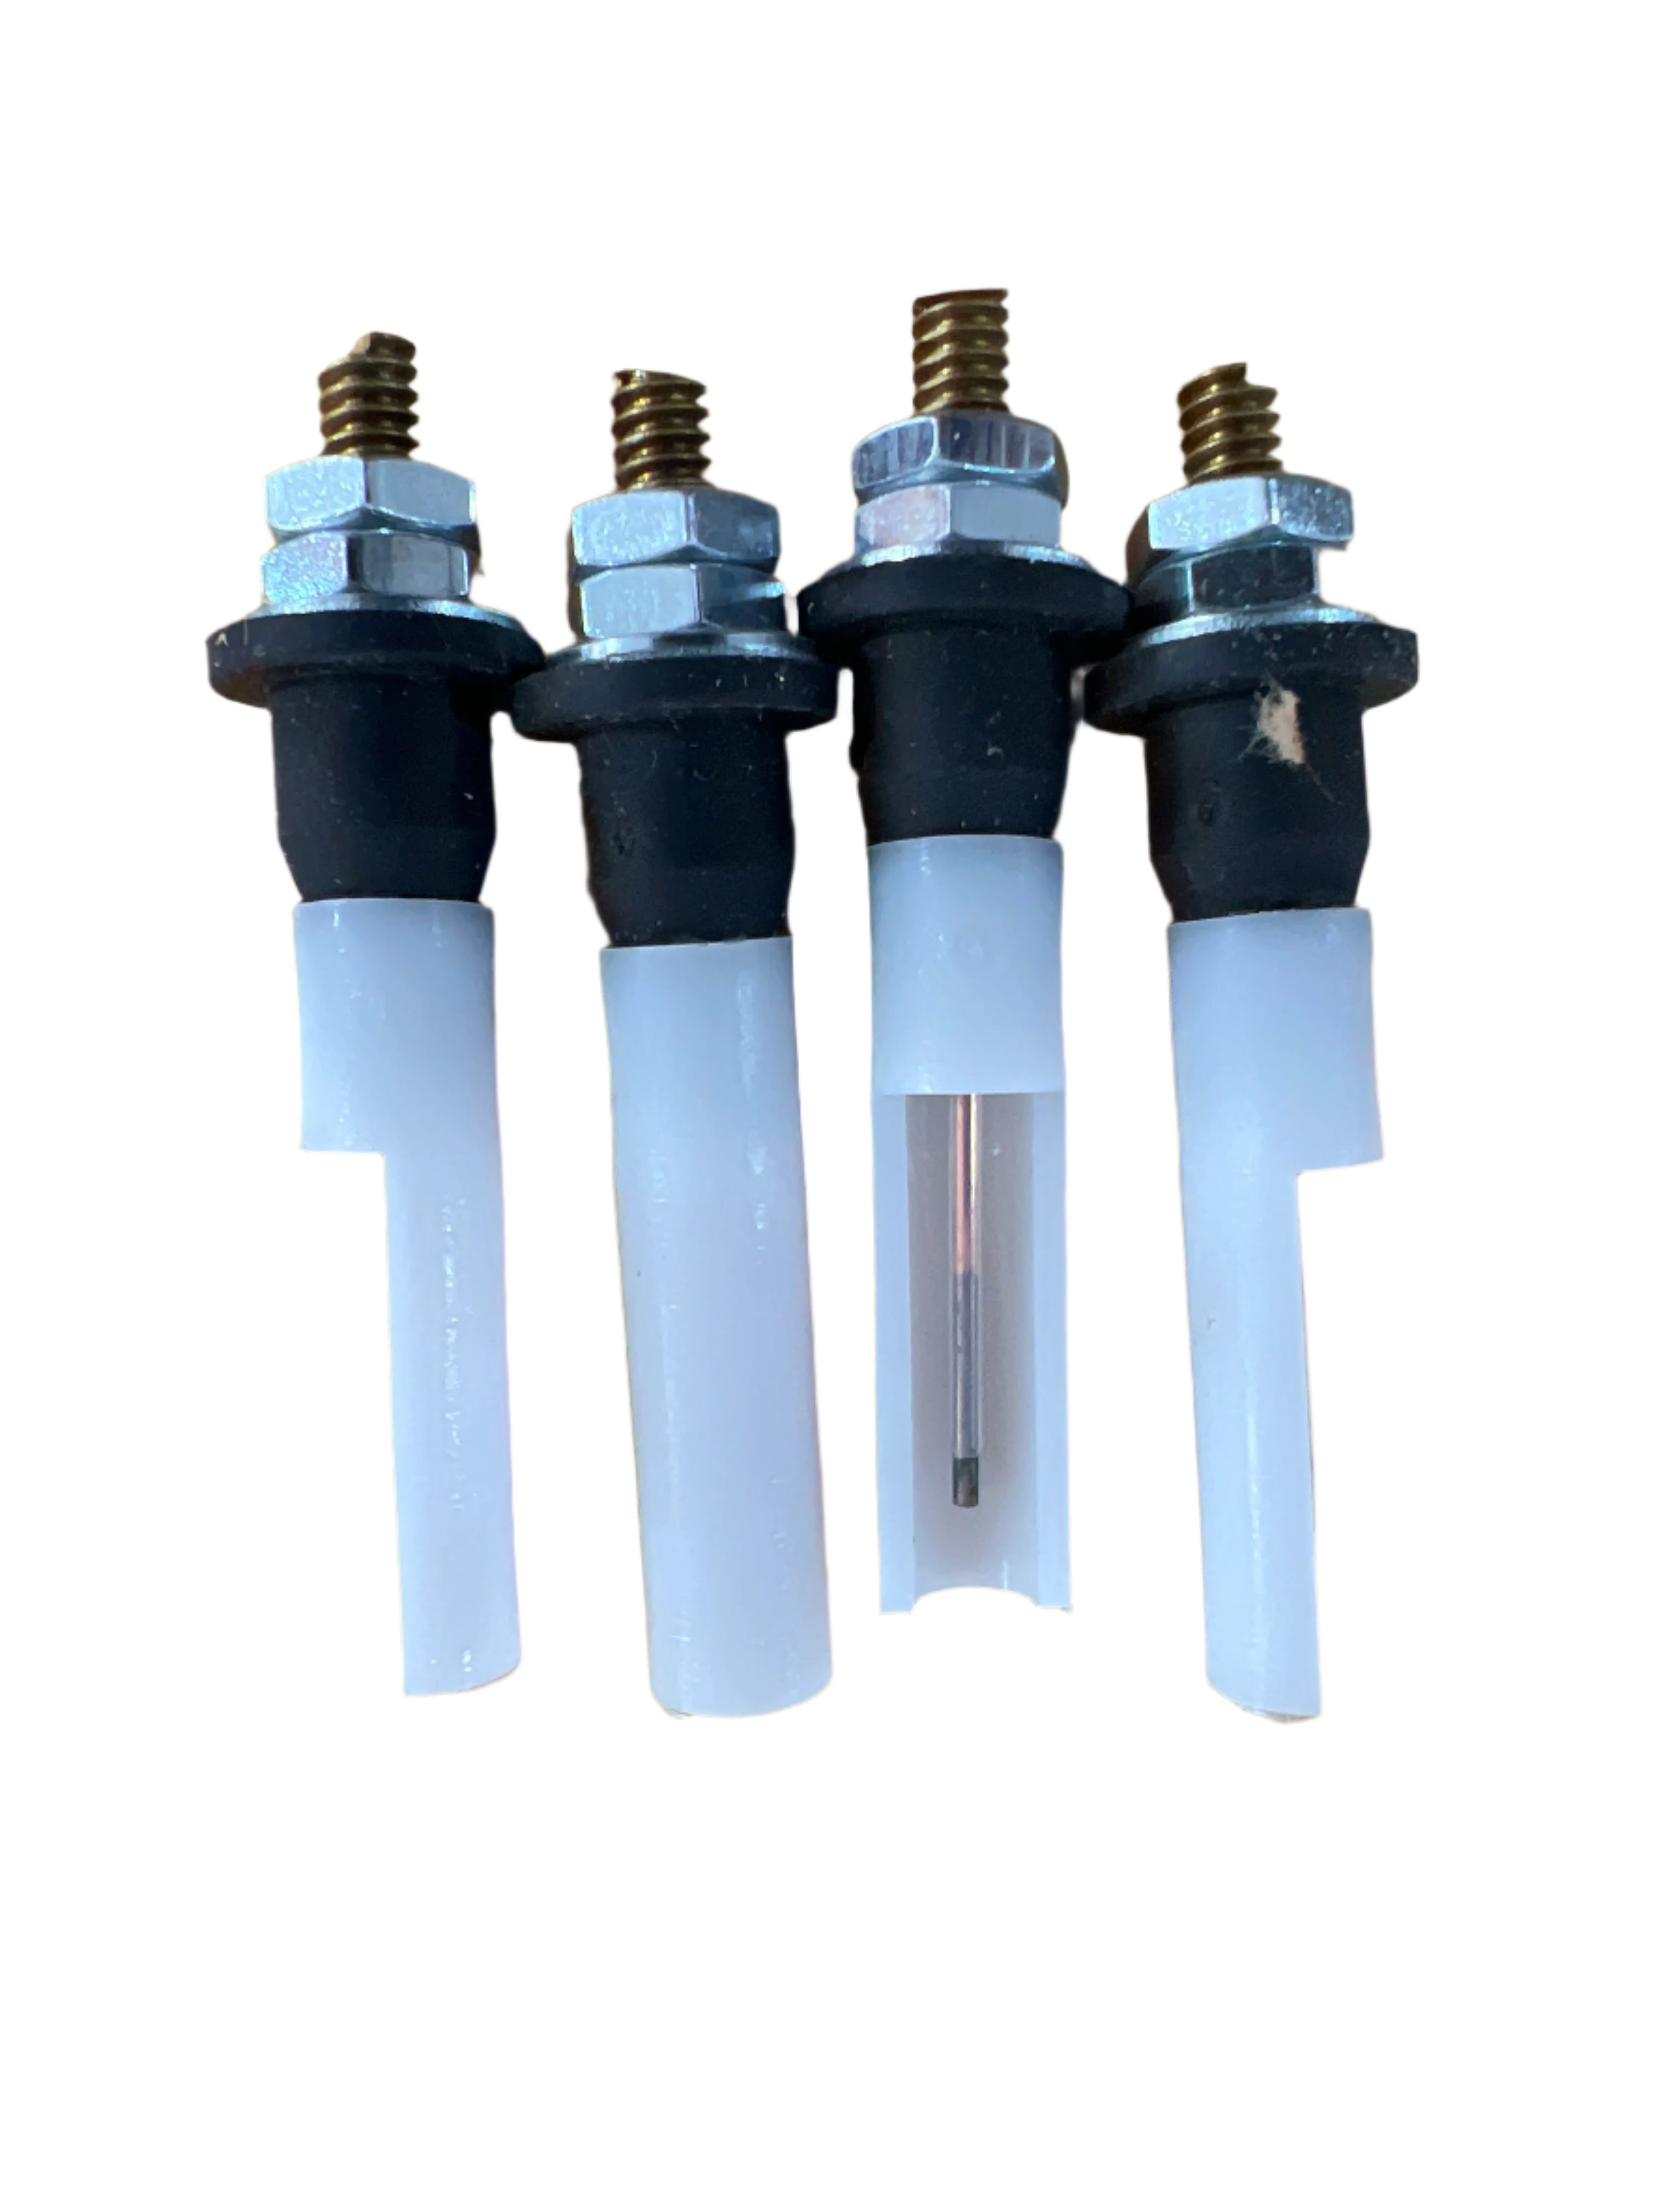
- 4 Horst Miracle Probe Sensors: Premium mini probe sensors (#A2A2) with hooded debris protection provide accurate 4-level monitoring (full, 3/4, 1/2, empty) so you always know your tank status
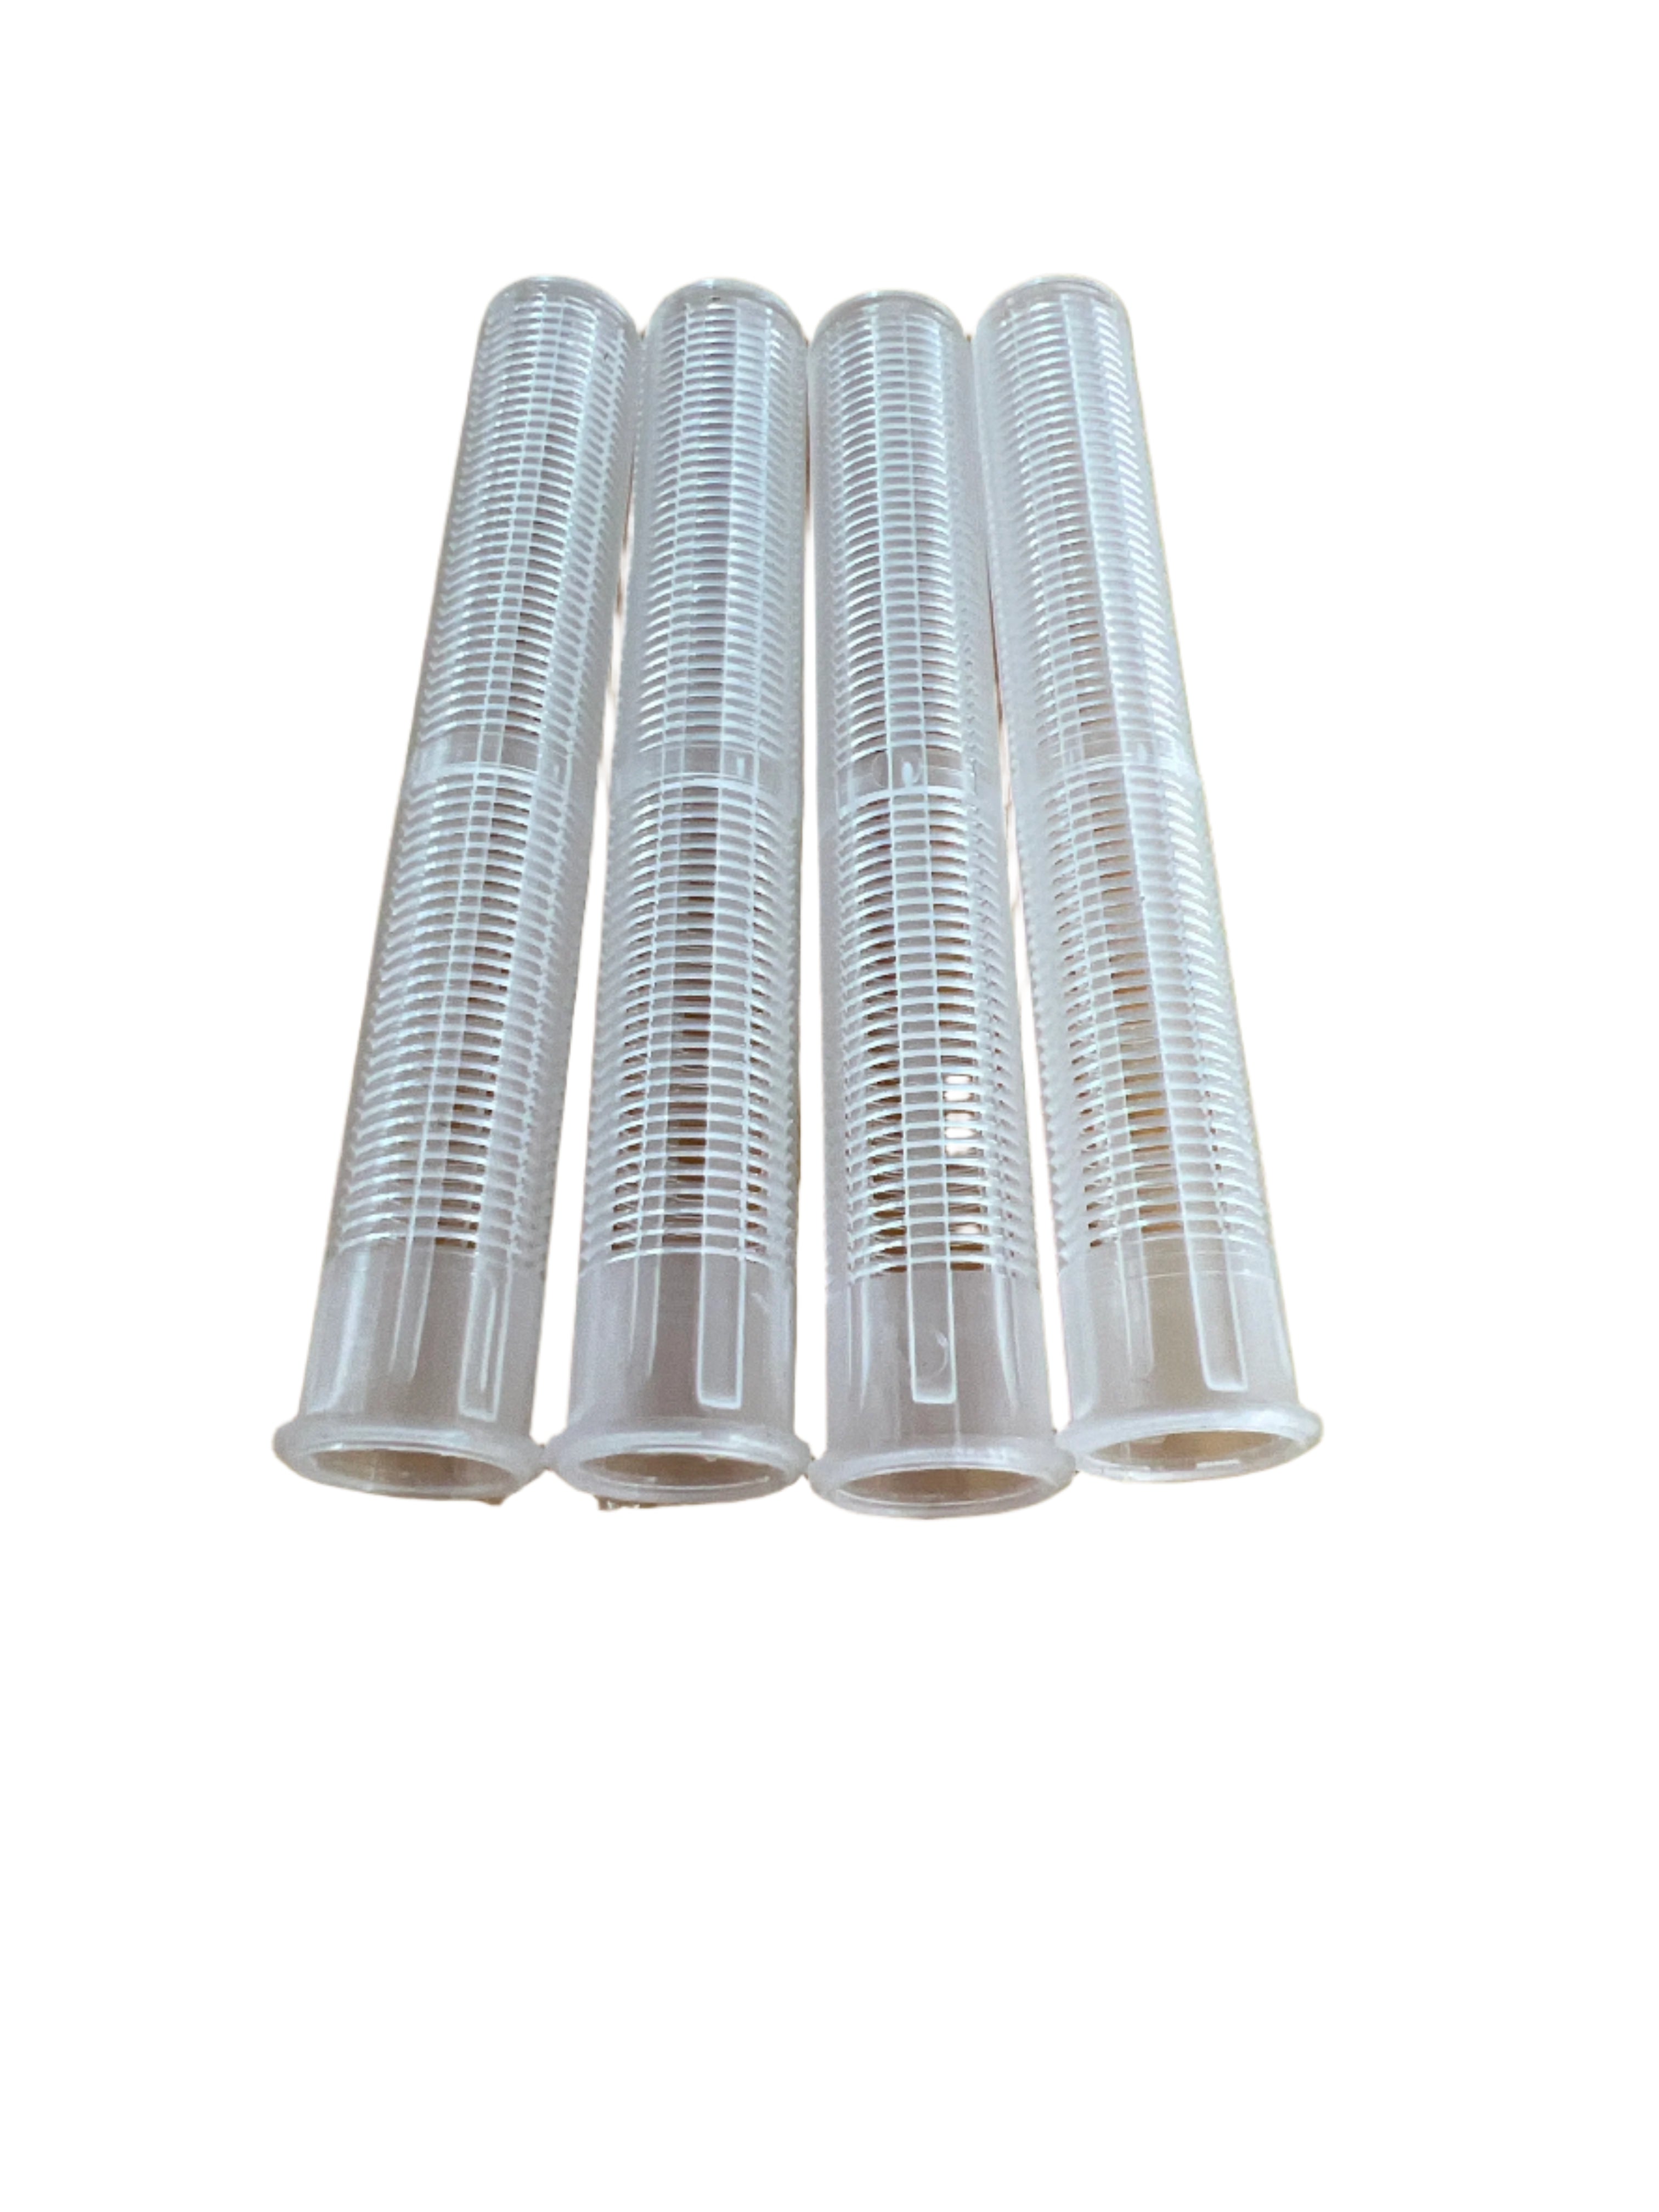
- 4 Probe Screen Covers: Protective covers (#311) shield sensors from debris and waste buildup, ensuring long-term accuracy and easy cleaning
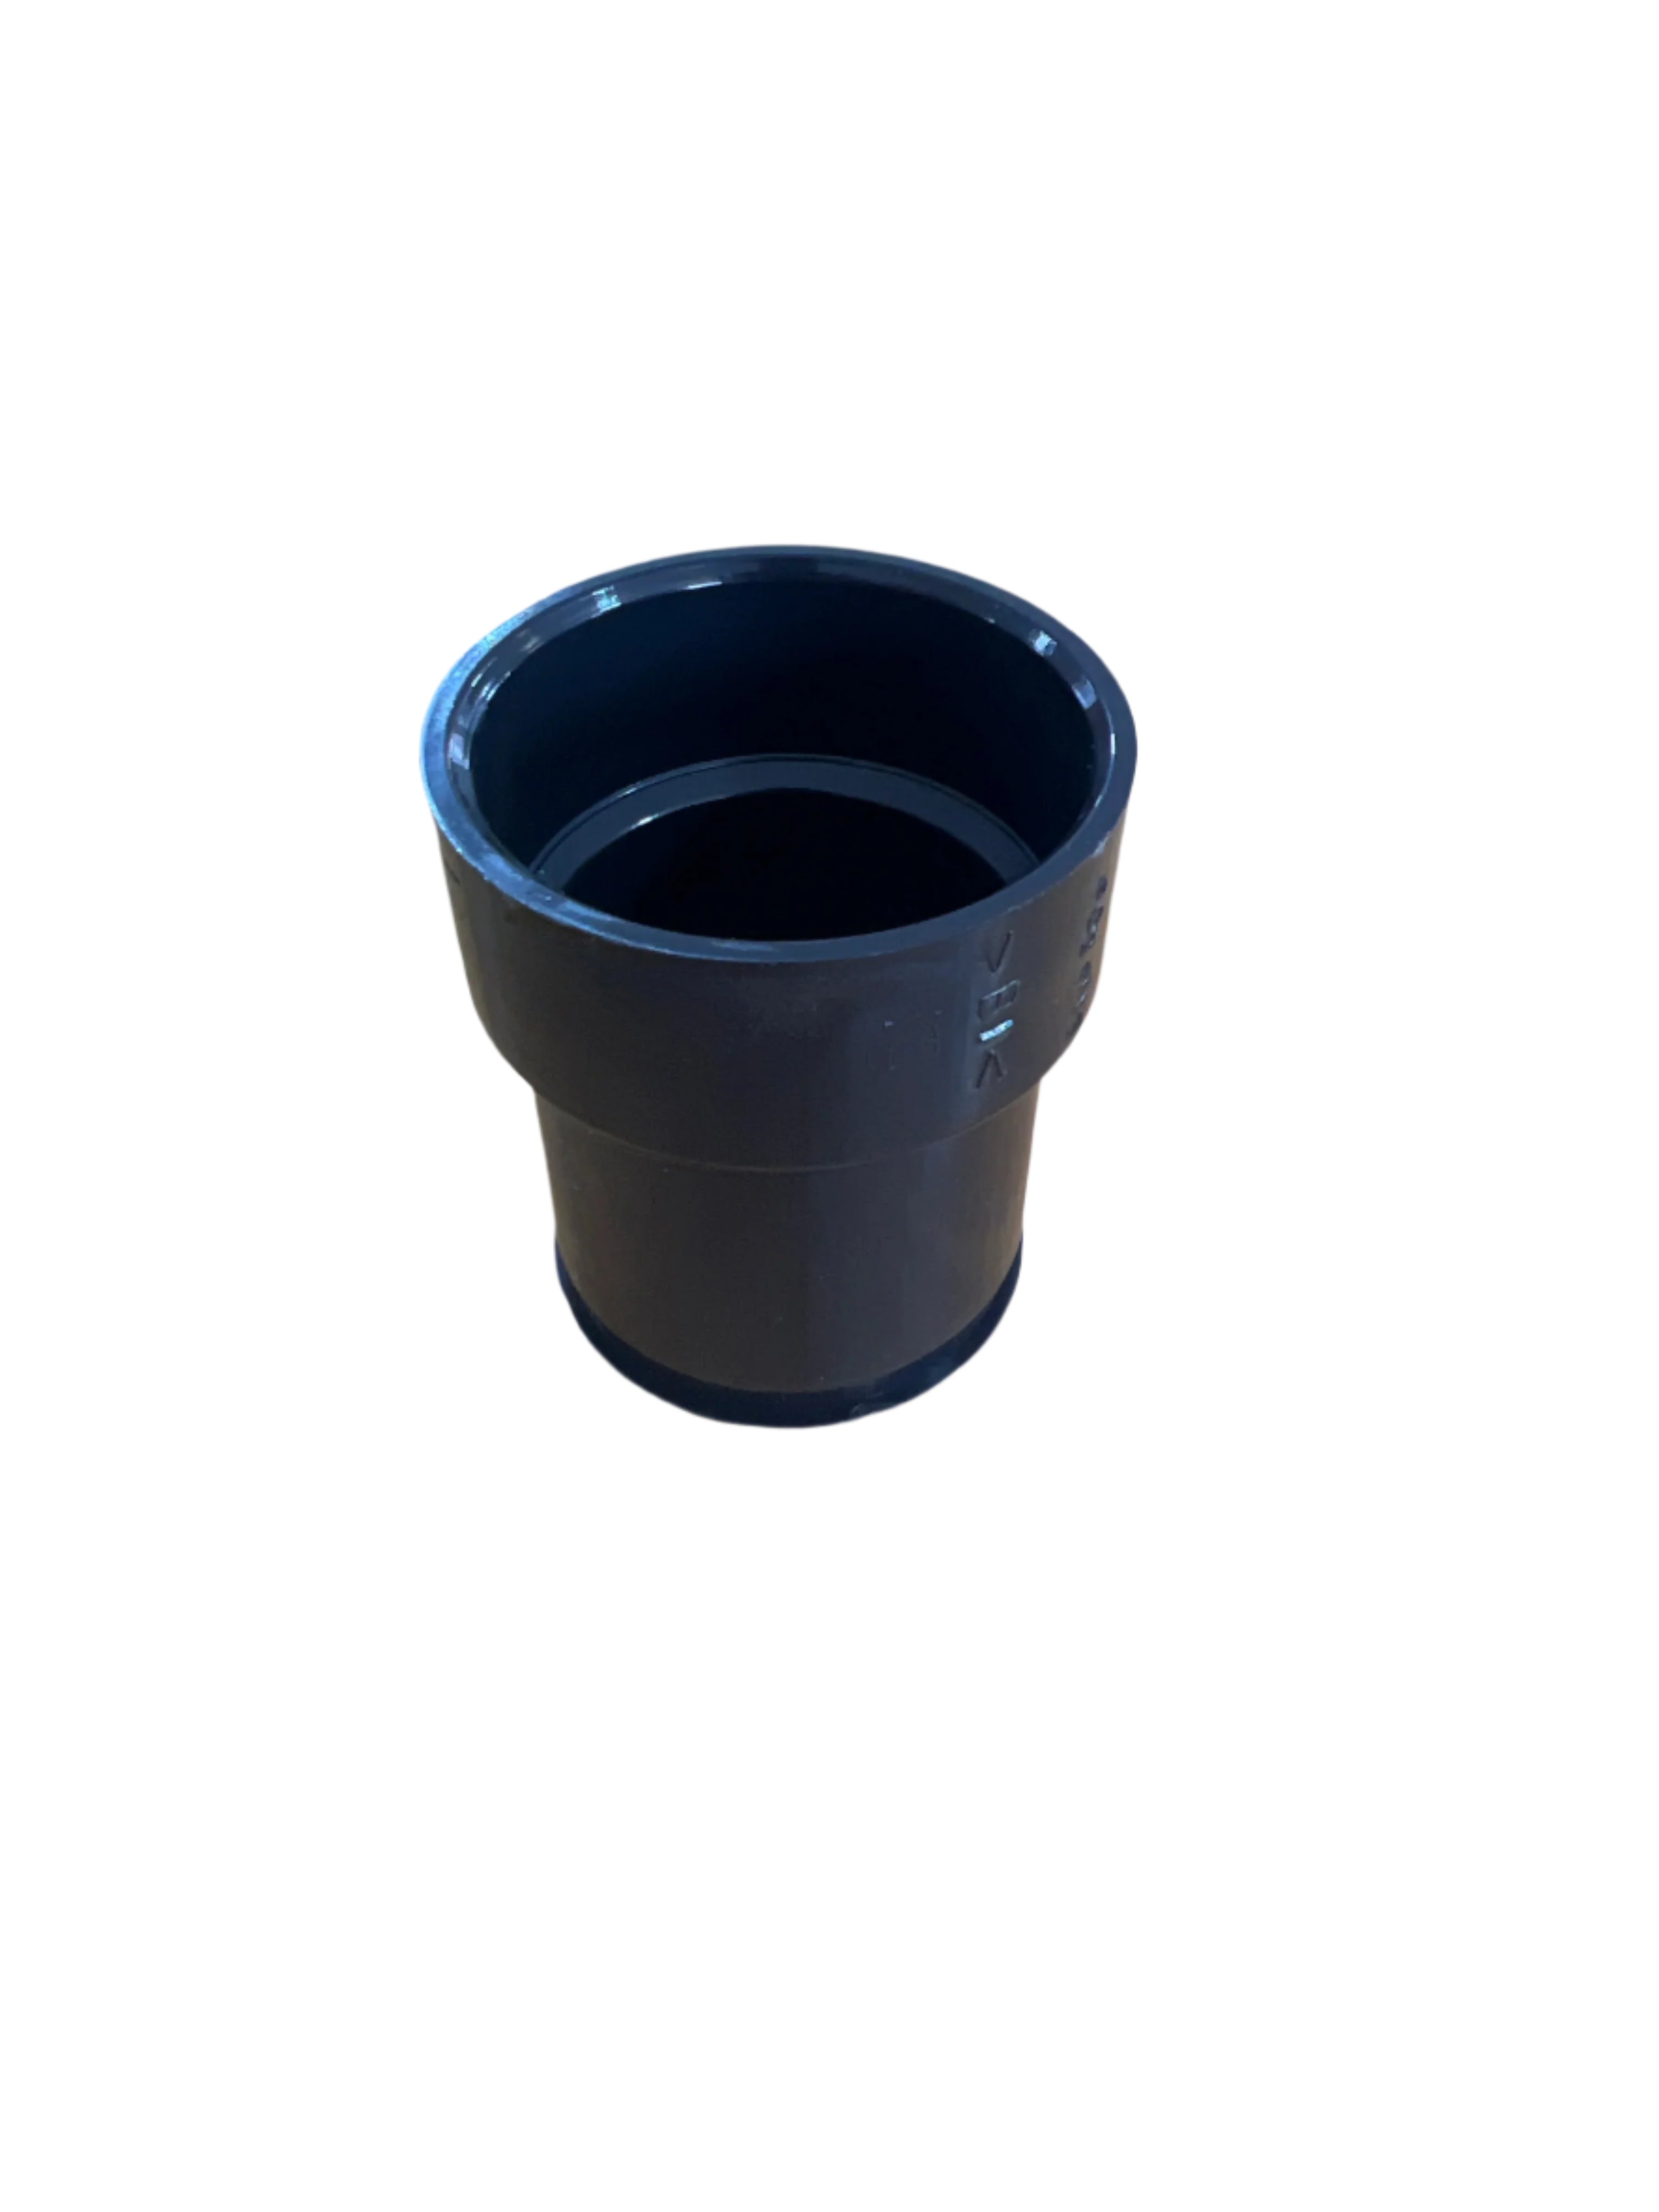
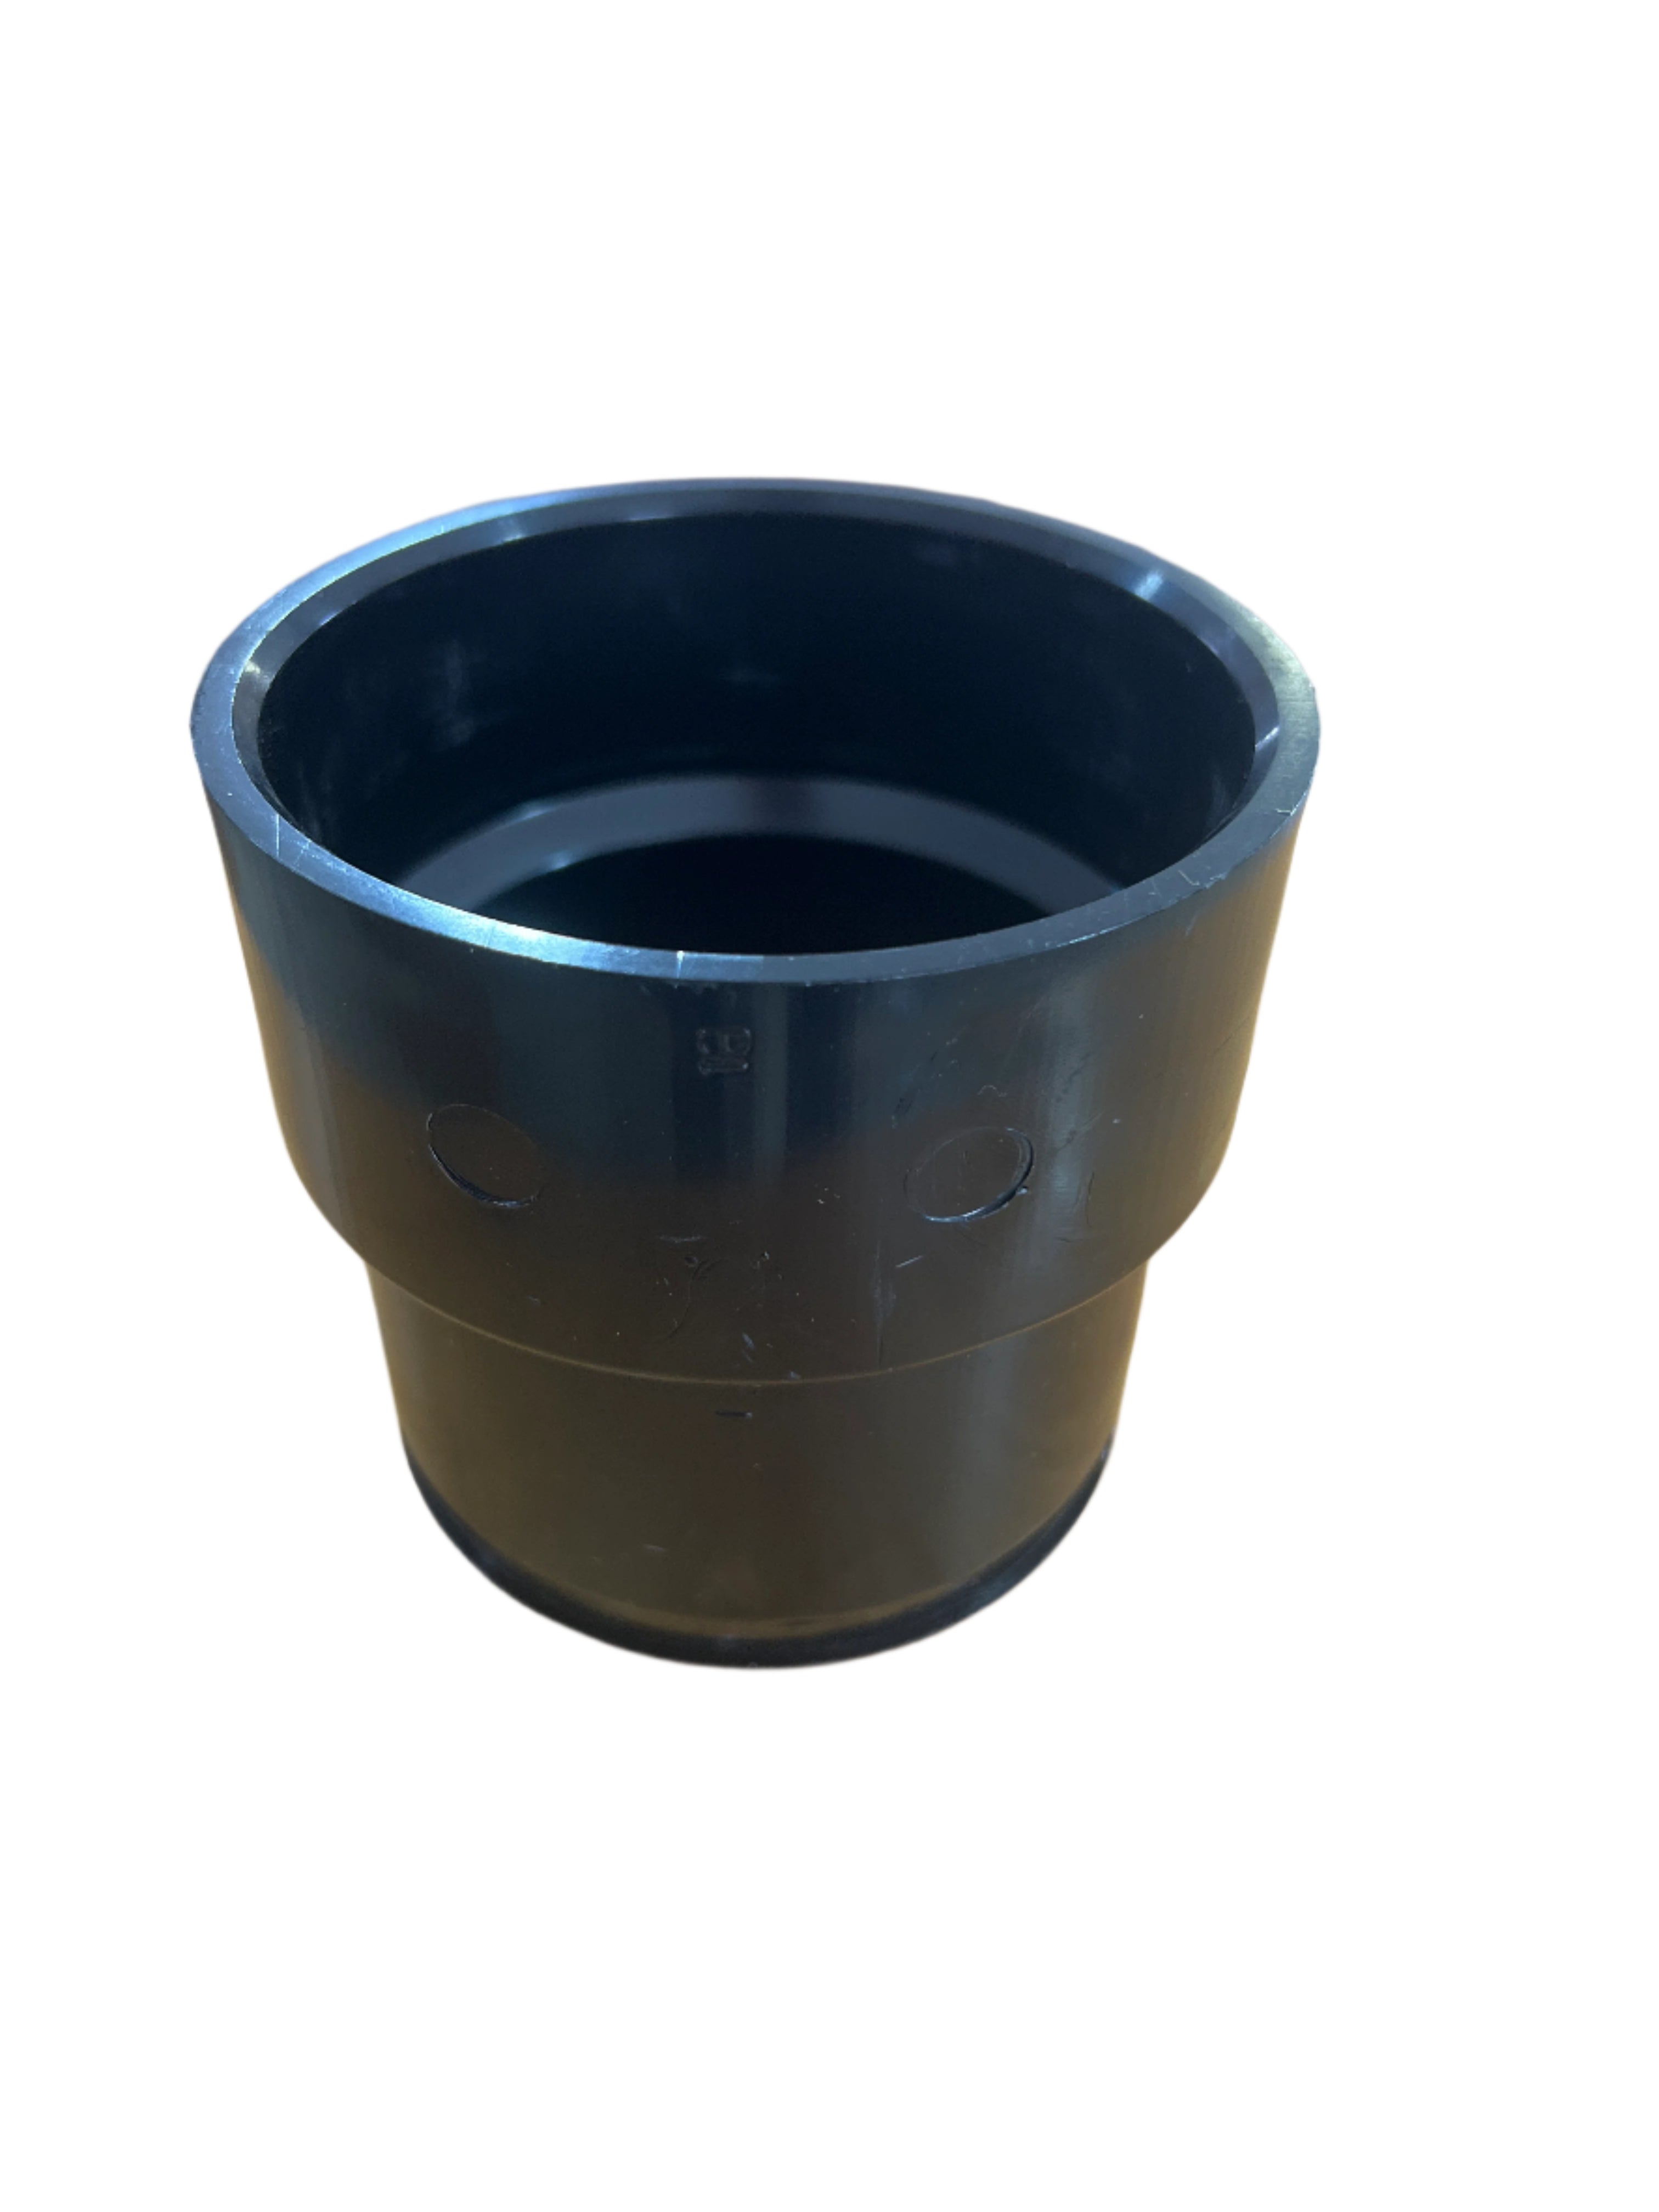
- Multiple Barbed Couplers: Includes 3x 1-1/2" ABS barbed couplers (#BI-B11150B) and 1x 3" ABS barbed coupler (#BI-B1130B) for drain and vent connections
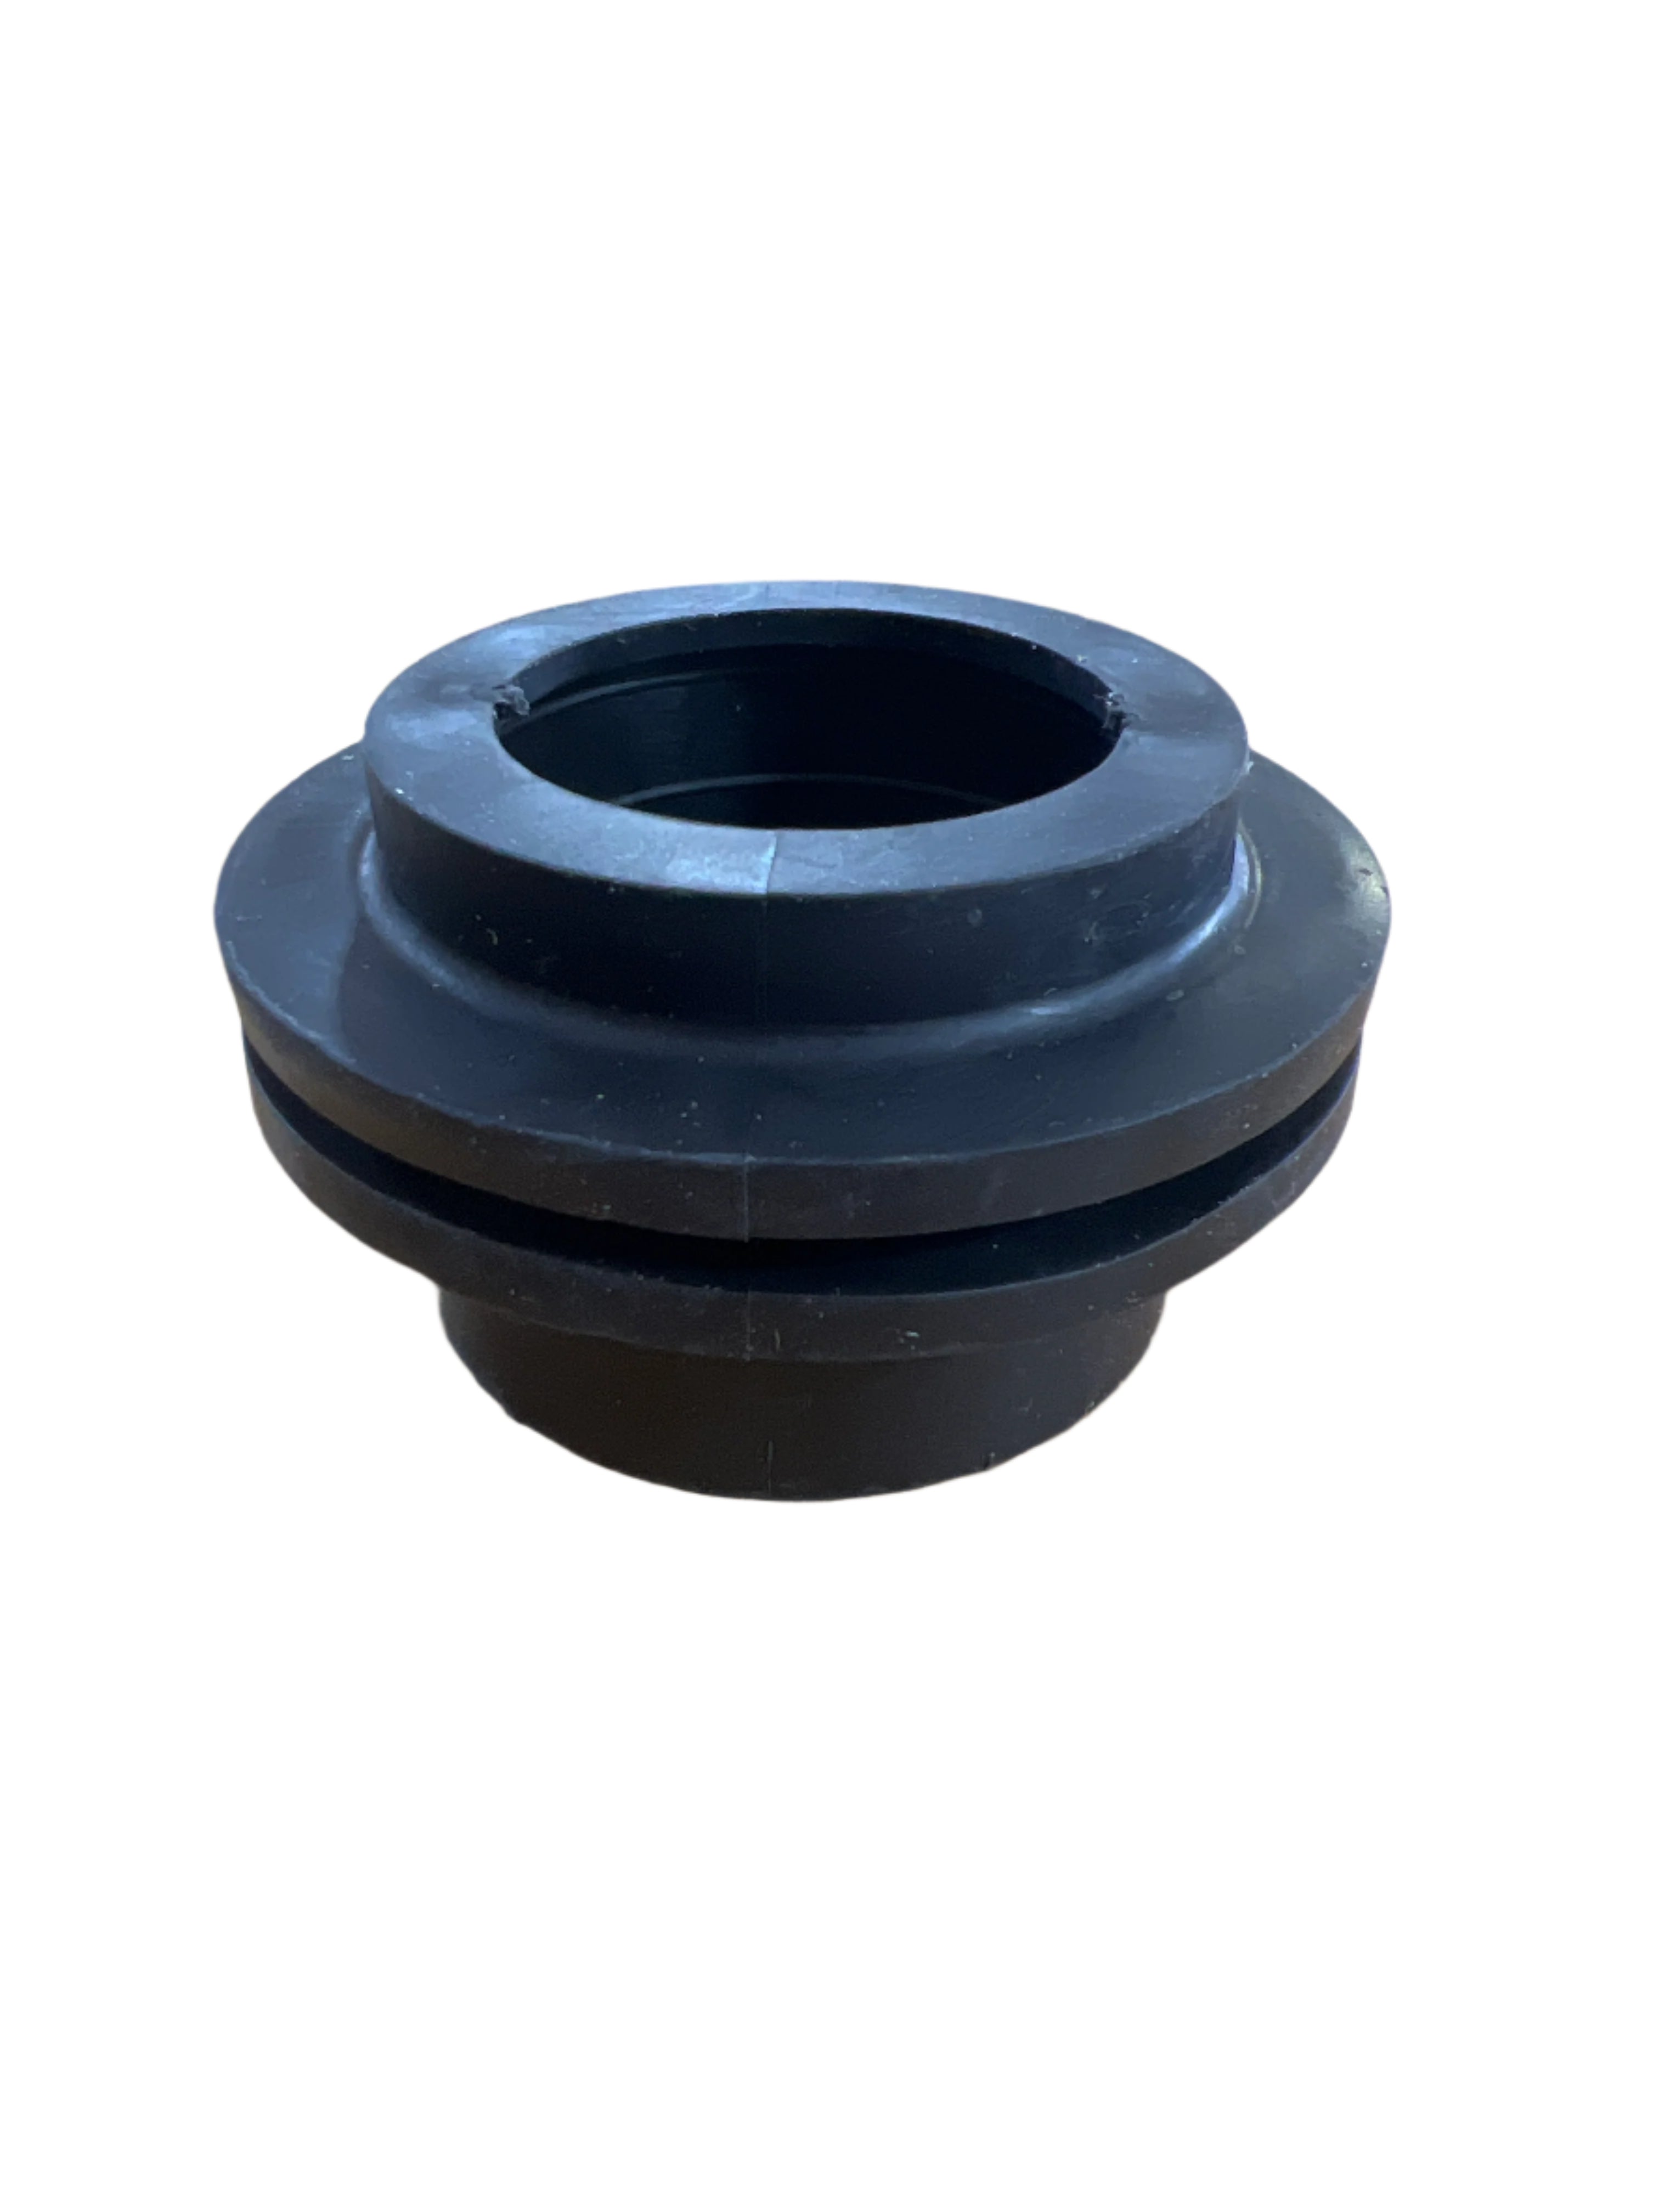
- Matching Grommets: 3x 1-1/2" grommets (#BI-B1115) and 1x 3" grommet (#BI-B113) create leak-proof seals for all fittings
- Universal Compatibility: Works with most RV black water and grey water holding tanks from all major manufacturers
- OEM-Grade Quality: Same components used by RV manufacturers during original production - proven reliability you can trust
- Complete Installation Guide: Detailed PDF instructions with step-by-step photos make installation simple (Download Installation PDF)
Why Choose This Universal Holding Tank Fittings Kit?
When you're investing in a new holding tank or repairing your existing system, the fittings you choose make all the difference between a leak-free installation that lasts for years and a frustrating project that requires constant repairs. This kit eliminates the guesswork by including every component you need in the correct sizes and quantities. The Horst Miracle Probe sensors are the industry standard for accuracy and durability, with hooded debris protection that prevents the false readings and sensor failures common with cheaper alternatives. The ABS barbed couplers and grommets create permanent, leak-proof connections that withstand the vibration and movement of RV travel without loosening or cracking. Whether you're a mobile RV technician outfitting customer tanks, a DIY enthusiast tackling your first tank installation, or an RV dealer preparing tanks for sale, this kit provides professional results with straightforward installation that doesn't require specialized tools or welding equipment.
Compare RV Tank Fittings Kits & Components
Choosing the right fittings for your RV tank project? Compare our complete kits and individual components:
| Product | Application | Sensors Included | Couplers/Grommets | Best For | View Details |
|---|---|---|---|---|---|
| Holding Tank Kit | Black & Grey Water | 4 sensors + covers | 3x 1.5", 1x 3" sets | Complete holding tank installation | Current Product |
| Fresh Water Kit | Fresh Water | 4 sensors | Multiple sizes (1/2" to 2") | Fresh water tank installations | View Fresh Kit |
| 3" Barbed Coupler | Holding Tanks | None | Individual 3" coupler | Replacement or additional 3" fittings | View 3" Coupler |
| 1.5" Barbed Coupler | All Tank Types | None | Individual 1.5" coupler | Replacement or additional 1.5" fittings | View 1.5" Coupler |
Pro Tip: This holding tank kit is optimized for black and grey water applications with the right mix of 1.5" and 3" fittings. For fresh water tanks, choose the Fresh Water Kit which includes multiple grommet sizes for universal compatibility.
Technical Specifications
- Part Number/SKU: ERVP-HOLDINGTANKKIT
- Manufacturer: Elkhart RV Parts (OEM-grade components)
- Application: Black water and grey water holding tanks
- Weight: 2.2 lbs (complete kit)
- Barcode/UPC: 52243352
- Country of Origin: USA
- HS Code: 391740
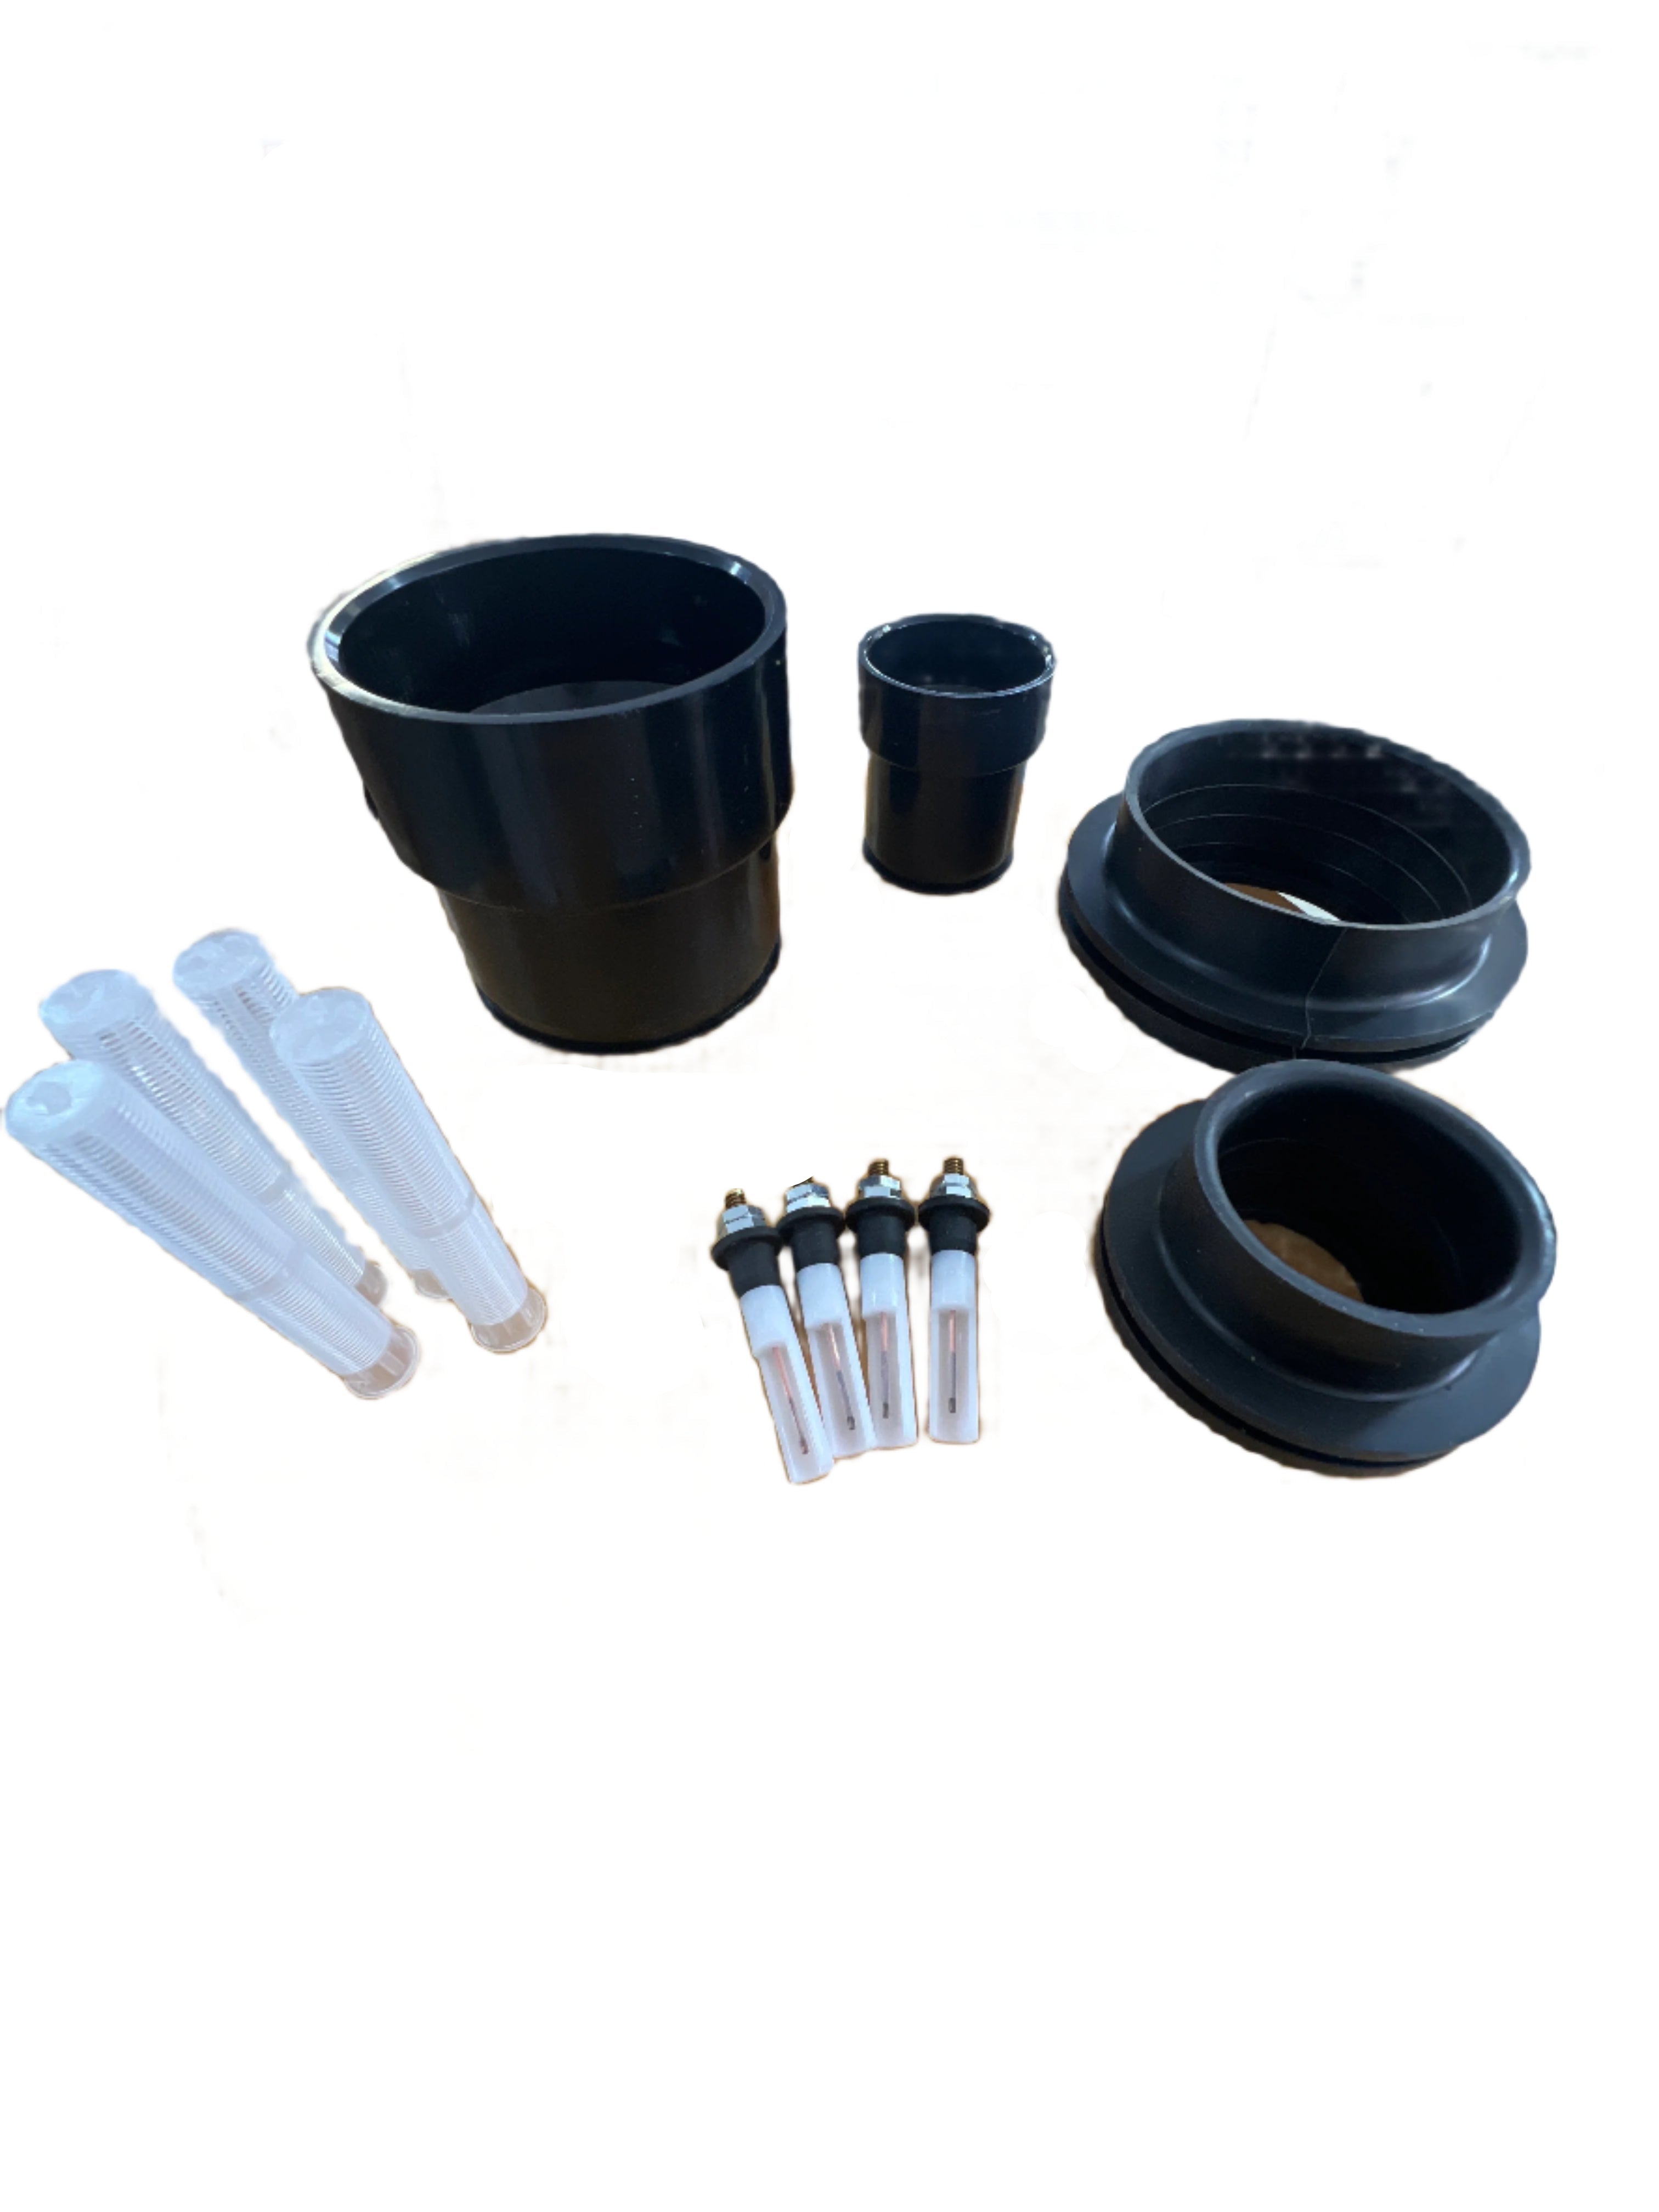
What's Included in the Kit
- 4x Probe Screen Covers (#311) - Enhanced sensor protection and accurate readings
- 4x Horst Miracle Probe Mini Sensors (#A2A2) - With hooded debris protection
- 3x 1-1/2" ABS Barbed Couplers (#BI-B11150B) - For vent and drain connections
- 1x 3" ABS Barbed Coupler (#BI-B1130B) - For main drain connection
- 3x 1-1/2" Grommets (#BI-B1115) - Leak-proof seals for 1.5" fittings
- 1x 3" Grommet (#BI-B113) - Leak-proof seal for 3" fitting
- Detailed installation instructions with photos (Download PDF)
Tools You'll Need (Not Included)
- 3/8" drill bit (for installing sensors)
- 2-1/2" hole saw (for 1-1/2" grommets)
- 4" hole saw (for 3" grommet)
- Electric or cordless drill
- Safety goggles
- Tape measure
- Dish soap or hand soap (for installation)
- Deburring tool (knife or sandpaper works too)
Installation Overview
Installing Grommets & Barbed Couplers:
- Mark tank exactly where you want fittings (double-check measurements)
- Make starter hole for hole saw
- Cut tank hole with appropriate hole saw (2-1/2" or 4")
- Deburr hole thoroughly for tight seal
- Push short end of grommet into hole until flush
- Apply dish soap to barbed coupler and push into grommet until it snaps and locks
Installing Level Sensors:
- Mark sensor positions at end of tank (keep finger-width from edges)
- Standard formation: Top center (full), middle-side (half), bottom corner (empty), bottom center (empty)
- Drill 3/8" holes and remove burrs
- Push probe sensor into hole, wiggle into place, twist nut to tighten
Full detailed instructions with photos included in kit and available in downloadable PDF format.
Professional Spin Weld Installation Available
Don't want to tackle this as a DIY project? We offer professional custom spin weld installation services! See our custom installation options here.
Why choose our custom tank welding process?
- OEM Certified Application: Same process used by RV manufacturers
- Permanent Leak-Proof: Spin welding eliminates seams and voids at stress points
- Triple QC Check: Impact proof, air tight, and water tight testing on every tank
- Professional Results: Get it right the first time with our trained technicians
Compatible Models & Alternatives
This kit works with most RV black water and grey water holding tanks. Looking for related components? Browse our complete selection of RV Tank Fittings. For fresh water tank installations, check out our Universal Fresh Water Tank Fittings Kit. Need individual replacement components? We stock 3" barbed couplers and 1.5" barbed couplers separately.
Frequently Asked Questions
How do I know if I need the holding tank kit or fresh water kit?
This holding tank kit is designed for black water and grey water tanks with the right mix of 1.5" and 3" fittings for typical waste tank configurations. The fresh water kit includes multiple grommet sizes (1/2" to 2") for potable water applications. Choose based on your tank type.
Can I install this kit myself or do I need professional help?
Most DIYers with basic tools and mechanical skills can complete this installation following our detailed instructions. The process involves drilling holes, installing grommets, and mounting sensors - no welding required. For permanent leak-proof installation, consider our professional spin weld service.
Will these sensors work with my existing tank monitor panel?
The Horst Miracle Probe sensors are compatible with most standard RV tank monitoring systems. Verify your monitor panel accepts standard probe-style sensors before installation.
What's the difference between barbed couplers and threaded fittings?
Barbed couplers use grommets to create leak-proof seals and connect to flexible hose with hose clamps. They're easier to install than threaded fittings and don't require pipe thread sealant. The barbed design grips hose securely for vibration-resistant connections.
How accurate are the Horst Miracle Probe sensors?
Horst Miracle Probes are industry-standard sensors known for accuracy and reliability. The hooded debris protection prevents false readings from waste buildup, and the screen covers provide additional protection for long-term accuracy.
Can I add more sensors than what's included in the kit?
Yes! You can purchase additional sensors separately if you want more monitoring points. The standard 4-sensor configuration (full, 3/4, 1/2, empty) works well for most applications.
Why Buy from Elkhart RV Parts?
As the only authorized dealer for Elkhart Plastics and CPI components, we guarantee 100% authentic OEM-grade parts - never knockoffs or inferior substitutes. This kit includes the same components used by RV manufacturers during original production. We maintain deep inventory for fast shipping, provide expert technical support, and offer professional spin weld installation services for customers who want permanent, leak-proof results. Our team understands RV tank systems and can help you select the right components for any installation or repair project.
Ready to complete your RV holding tank installation with professional-grade fittings and accurate level monitoring? Order this complete kit now for fast shipping and get everything you need in one package. Questions about installation or compatibility? Our AI Live Chat has deep product knowledge and can help you with technical guidance and fitment questions.
| Width (inches) | 8 |
|---|---|
| Height (inches) | 6 |
| Length (inches) | 10 |
| Weight (pounds) | 4.2 |
| Probe inserts model | A2A2 |
| 3 inch grommet model | BI-B113 |
| Probe inserts material | Horst Miracle Probe mini probe/sensor tank inserts with hooded debris protection |
| Probe inserts quantity | 4 |
| 3 inch grommet quantity | 1 |
| 1-1/2 inch grommets model | BI-B1115 |
| Probe screen covers model | 311 |
| 1-1/2 inch grommets quantity | 3 |
| Probe screen covers quantity | 4 |
| 3 inch abs barbed coupler model | BI-B1130B |
| 3 inch abs barbed coupler quantity | 1 |
| 1-1/2 inch abs barbed couplers model | BI-B11150B |
| 1-1/2 inch abs barbed couplers quantity | 3 |
- What components are included in the universal holding tank fittings kit? The kit includes 4 probe screen covers (#311), 4 Horst Miracle Probe mini probe/sensor tank inserts (#A2A2), 3 1-1/2" ABS barbed couplers (#BI-B11150B), 1 3" ABS barbed coupler (#BI-B1130B), 3 1-1/2" grommets (#BI-B1115), and 1 3" grommet (#BI-B113).
- What tools do i need to install the fittings and sensors from this kit? You will need a 3/8" drill bit, 2-1/2" hole saw, 4" hole saw, drill (electric or cordless), safety goggles, tape measure, dish or hand soap, and a deburring tool such as a knife or rough sandpaper.
- Can this kit be used for both black water and grey water rv tanks? Yes, this Universal Holding Tank Fittings Kit is designed for use with both black water and grey water RV tanks.
- Is there an option to have the fittings professionally installed? Yes, if you prefer not to do the installation yourself, Elkhart RV Parts offers a custom fittings installation service where they professionally spin weld the fittings onto your tank.
- How do i install the sensors to measure the tank water levels? You should mark the tank where you want the probes, typically placing them at the top center, middle end between the middle and side, bottom right corner, and bottom center. Drill 3/8" holes at these locations, deburr the holes, insert the probes by wiggling them into place, and then twist the nuts to tighten.
Product Documents & Manuals
Ready to order
Elkhart RV Parts - Universal Holding Tank Fittings Kit - Black & Grey Water - 4 Sensors - 3" & 1.5" Couplers - Complete DIY Installation Kit
Uses the existing quantity, variant, and delivery estimate

Factory-Fresh OEM Parts — the same brands installed in new RVs straight from Elkhart. Genuine, name-brand components made to order — never generic, never outdated. Sourced directly from the original RV manufacturers for perfect fit and factory-level quality.